 I promised to share this little trick I learned at Leadership on how to make the Perfect Bow so here goes! This is what I now use to make my bows. It’s a bit different and fancier than what they showed us at Leadership (theirs was just a bit of cardboard), but with my OCD and need for perfection I actually covered mine with Designer Series Paper and applied Modge Podge so it would keep for awhile. I do make alot of bows you know! I am usually making the same sized bows to fit a standard A4 card so this is what I came up with for myself. What follows is a tutorial on how to make the Perfect Bow Maker and then I will show you the 5 steps to making the Perfect Bow!
I started with a piece of left over heavy weight cardstock backing from one of Stampin’ Up’s Specialty Designer Series Paper (DSP) packs since it is a bit heavier than the cardstock backing in the regular DSP packs. I then cut a square measuring approximately 2-3/8″ x 2-3/4″ using a heavy duty pair of scissors. The inside section you will need to cut out is 3/4″ x 1-1/4″. I then cut out two pieces of the new Everyday Enchantment Designer Series Paper which is featured as one of the FREE items you can select from the Sale-A-Bration Catalog when you purchase $50.00 in Stampin’ Up! product. Such a pretty paper! I applied the DSP to the square using a Glue Stick – so easy. Then I trimmed away any excess hangover edges with my Paper Snips and filed the edges with my Distressing Tool to smooth them out. Don’t forget to cover both sides.
I sponged the edges with Baja Breeze ink to purty it up. Then I applied Modge Podge all over my Bow Maker to protect the DSP, make it sturdy and keep it dirt free from finger prints. I applied it to one side just enough to cover it and the edges and waited 5 minutes for it to dry and then flipped it over and repeated the process.
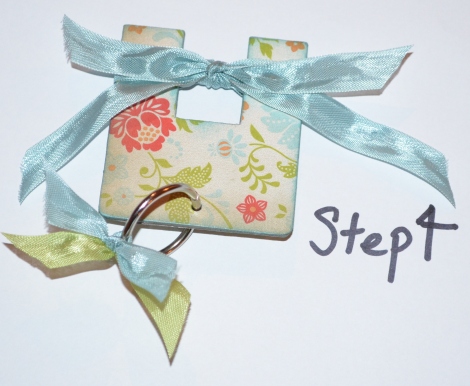
 I punched a hole in the bottom center of my Ribbon Maker with my Crop-A-Dile using the smaller hole puncher and inserted a one-inch Book Ring. Added some Baja Breeze and Pear Pizzazz Seam Binding Ribbon to the ring to jazz it up abit. The ring will allow me to attach it to my stamp/scrap supply bag and keep it handy for use. Here’s another view of it. Isn’t this just the coolest thing ever? If you’re not sure yet, you will be soon. Just after the supply list is a 5 Step process on how to make the Perfect Bow!
Supplies: Heavyweight Card Stock Backing from Stampin’ Up! Specialty DSP pack or Chip Board, Heavy Weight Scissors, Enchanted Evening DSP, Glue Stick, Crop-A-Dile, Modge Podge and Sponge Brush, One-Inch Book Ring, Stampin’ Sponge, Baja Breeze Classic Ink, Baja Breeze and Pear Pizzaz Seam Binding Ribbon.
HOW TO MAKE THE PERFECT BOW TUTORIAL!
You will need the following supplies: The Perfect Bow Maker, 2 pieces of Ribbon – one measuring 16″ and the other 6″, and Scissors.

Step 2 - Take the long right side of the ribbon and start wrapping it around to the back of the Bow Maker - wrap it twice around for a double loop bow and once for a single loop bow. You will always want to end up with the ribbon on the lower right side front of the Bow Maker. The length of ribbon used in this tutorial is for a double loop bow.

To gather the center of your bow, you will need the 6" piece of ribbon. Insert the ribbon from the back of your Bow Maker and pull it up through the bottom center of your wrapped ribbon as shown in the picture towards the front. You will then tie the 6" ends together giving you a second set of ends for your bow as shown in the next picture. Tie it a second time to secure the bow.

Step 4 - This is how your bow should look once you have tied the 6" ends securely. Now you can flip it over and begin to trim the ends. Slowly remove the bow from the Perfect Bow Maker.

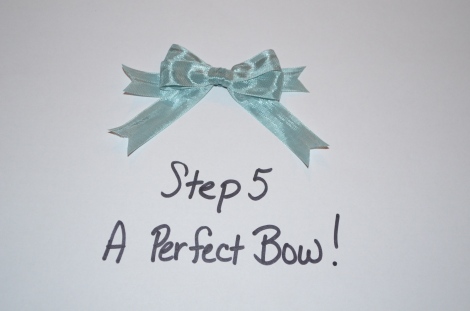
Now that you have trimmed your ends, you can pull apart your double loops and shape your Perfect Bow!
If you want to save on ribbon, you can use a piece of Linen Thread to gather the center of your bow and add a Basic Pearl to jazz it up a bit as shown here on my project from last week. I prefer the Linen Thread myself as you can get a tighter looking bow. Also, if you want to make a bigger or smaller bow, just adjust the width of your bow maker when you are cutting out your pattern.

If you are not all about the fuss of making one yourself and would like to purchase a Perfect Bow Maker for $7.95 plus shipping, please e-mail me at sweadon@hotmail.com. Local Pickup is free, of course!


.jpg)


Thank you for the wonderful tutorial, Sherahl. I love this!
Your welcome Shawn!
this is awesome!! so glad i saw it pined on someones board i follow 🙂
TFS!!! Cant wait to try it out, as I too am bow challenged! I would also make the OCD version as it will hold up better! Thanks again!
This is great! Thanks for sharing!!
I have a bow maker someone made me and couldn’t remember how to use it. Thanks so much for the tutorial!
Thanks so much for sharing, I have made these for my stamp club ladies, I’m sure they are going to love them too.
Thank you for sharing the directions for this great little tool and box. Your name sounded familiar so I clicked on your profile and saw a face that looked familiar. When I read about your son, it clicked for me again. I think you and I chatted – maybe on a plane? – en route to or from convention many years ago. Are you in the mid-Atlantic region? Thanks again for the great tutorial.
Peggy Rosche Outen
stampinpegcadillo.blogspot.com
Hey Peggy! Thanks for checking out my blog. We met at the Stamp Retreat in Southern MD I believe.
Great tutorial
Thanks this is great!