Mocha Morning Valentine

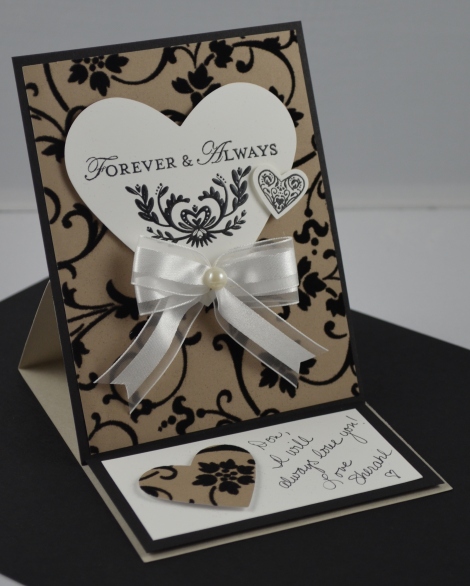
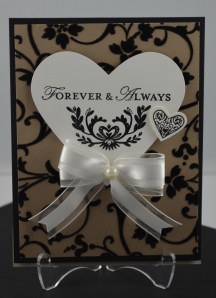
This is a just a quick blog entry to show you the card I made for my hubby for Valentine’s Day.  It is an Easel Card and was very easy to make.  I viewed Brian Pilling’s video from Stampin’ Up! to get all my measurements and scoring lines for construction. This card went together quickly especially when I could use my Simply Scored Tool to make all my scoring lines. Easel cards are great because it allows you to display your card creation, but it can also fold flat for mailing. No special mailing required. My hubby loved the fact that he could keep the card out for display on his dresser. I used my Perfect Bow Maker to make the bow on this card.

Supplies:  Stamp Sets: Loving Thoughts, Take It To Heart and Style Beautiful; Cardstock:  Whisper White, Crumbcake, and Basic Black; DSP:  Mocha Morning; Ink:  Craft Black Ink; Accessories:  Simply Scored Tool, Embossing Heat Gun, Clear Embossing Powder, Large Pearl Basic Jewels (8 mm), Hearts Collection Framelit Dies, Big Shot, 5/8″ Whisper White Organza Ribbon, Stampin Dimensionals.

Here is  Brian Pilling’s Easel Card Video from Stampin’ Up to help you with measurements and construction of an Easel Card.

Come to Bethlehem

I’m working into the wee hours at my Stamp/Scrap Retreat on next week’s Holiday Stamp A Stack cards and here is one of the cards which will be featured in that class. The “Come to Bethlehem”stamp set features the Three Wise Men as they are guided by a star to the New Born King. Perfect Plum along with our Brushed Gold Cardstock makes for sheer elegance and is definitely fit for a king! I love our Brushed Gold Cardstock because the color is throughout the paper even when cut – no white edges showing on this paper. The main image and the saying is stamped with Versamark Ink and embossed with Stampin’ Up!’s new Pewter Embossing Powder featured in the Holiday Mini Catalog.  I thought the right side of the card was looking alittle bare so I added the gold on gold strip which has been punched with the Scallop Trim Border punch and then finished off that corner with some Basic Pearls.  My last two Holiday Card Stamp A Stacks will be held on November 17 and 22 from 6-10 p.m.  See you there!

Supplies:  Stamp Set: Come to Bethlehem; Cardstock:  Perfect Plum, Brushed Gold, and Whisper White; Ink:  Perfect Plum and Versamark; Accessories:  Decorative Label Punch, Modern Label Punch, Basic Pearls, Mini Glue Dots, Scallop Trim Border Punch, Perfect Plum 3/8″ Taffeta Ribbon, 5/8″ Whisper White Organza Ribbon, Stampin’ Dimensionals, Pewter Embossing Powder, and Heat Embossing Gun.

Published in: on November 12, 2011 at 2:03 am  Leave a Comment  
Tags: , , , ,

Sailing “The Open Sea”!

On the Open Seas

Love, love, love this stamp set!  These projects are great for Father’s Day.  The first is a card using the Mosaic technique which I taught at my last  Technique Tuesday class. It’s so easy to make the mosaic stamp for this project by using all the remnants of your leftover rubber from your stamp sets and the largest of Stampin’ Up!’s acrylic blocks.

Mosaic Acrylic Block

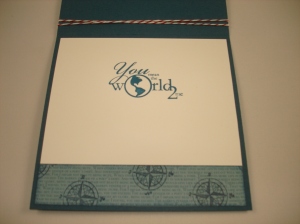
 I tried using the clear mount stamps when Stampin’ Up! first released them and purchased several of the acrylic blocks, but found out I am a die hard wood block stamper so I have a few acrylic blocks available now to use for this technique.  Just cut up the remnants and adhere them close together on the acrylic block. Stamp your image in black ink and color in with chalks, ink or markers. Apply Versamark Ink to the large mosaic stamp you made and stamp over the entire  image. Apply clear embossing powder and heat dry with your heat tool. Allow to cool and then with a sponge dauber rub Basic Gray or Basic Black over your entire image (i.e., apply your grout) and then wipe off any excess ink from the embossed areas with a kleenex.  I used the new Baker’s twine in Cherry Cobbler/White to embellish. I finished off the card on the interior with this beautiful saying from the stamp set “Word Play”.

Inside of Card - Word Play

Add a restaurant gift card along with a movie gift card to go see the “Pirates of the Caribbean: On Stranger Tides” to this double-sided box for Dad!  The boxes are  made with the Box #2 Sizzix Die and the Big Shot. Not Quite Navy and Cherry Cobbler are great nautical colors to use with this stamp set.

The last project is a hidden Kit Kat bar.  I love this trick to hide candy! Wrap your designer paper around your candy bar and crimp the ends with your crimper for decoration.

Kit Kat Bar Candy Wrap

Supplies:  Stamp Sets:  The Open Sea, Word Play, Teeny Tiny Wishes; Cardstock:  Not Quite Navy, Cherry Cobbler Whisper White and Basic Gray; Ink: Stazon Black, Basic Gray, Crumb Cake,  Cherry Cobbler, Not Quite Navy, Baja Breeze; Designer Series Paper: Regals Collection Patterns Stack; Accessories:  Stampin’ Dimensionals and Sponges, Vintage Brads, Crimper,  Small and Medium Oval Punches, 3/4″ Circle Punch, 2-3/8″ Circle Scallop Punch, Circle Scissor Plus and Glass Mat, Paper Piercing Tool and Pad, Aqua Painter, Big Shot with Standard and Extended Cutting Pads, Scallop Circles #2 Die and Box #2 Die.

Scallop Shower Flowers!

Try saying that three times! I’m still trying to catch up from my daughter’s wedding in October and am way behind in posting some of the pics of projects I made.  I love the way the centerpieces turned out that I made for Lindsey’s shower. 

Wedding Shower Centerpiece and Favor

It was a whole lot of scallop punching, but totally worth the end result!  These cute flowers are so easy to make.  Punch out eight scallops using Stampin’ Up!’s 1-3/4″ Scallop Circle Punch (four from cardstock and four from our lighter weight Designer Series Paper). Stack them every other (cardstock, DSP, cardstock, etc.). They don’t have to be lined up perfectly, you actually get a  better effect if they are scattered every which way in the stack. Punch a hole in the center of your stack with your paper piercer and insert a brad to hold it together.  Then beginning with your top scallop just start scrunching them up towards the center, until you have done the last one on the bottom, then fluff it out. Cool huh!  I did a catrillion of these while watching my favorite reality shows on tv.  I made four centerpieces for the shower using a variety of Stampin’ Up! colors based mainly around Elegant Eggplant and Old Olive throwing in some lighter purples and vanilla. The pots were made of paper mache and purchased at my local craft store. I painted them with green acrylic paint and brushed on some gold highlights with my gold ink pad, allowed them to dry overnight and then brushed on a coat of clear modge podge to seal in the paint and dress up the pots up a bit. I then inserted a styrofoam ball into each pot and adhered the flowers to the styrofoam using sticky strip and a glue gun on a light temp. If your glue is too hot it will melt the styrofoam. In the top corner of the arrangement you will find a cute little bird that was stamped again using the Punched Potpourri stamp set and then punched out with Stampin’ Up!’s exclusive 2-Step Bird Punch. I punched two of them out and glued them back to back on a piece of wire and inserted it into the arrangement. I then added ribbon and a small bunch of glass grapes to keep up with Lindsey’s vineyard wedding theme.  We were able to use these arrangements again at the wedding on 2 tables in the entry way of the mansion reception room, one in the ladies room to dress it up a bit on the counter, and one on the gift table.

Just a little share…. 

Wedding Shower Napkins - So Vintage!

 I found these beautiful napkins for the shower also at my local craft store. They are from the Paula Deen Collection. You would think that Paula herself had coordinated with Stampin’ Up! to make these beauties! They match our Vintage Vogue stamp set which I used to make Lindsey’s shower invites and wedding invitations. See the little birds on the napkin? That’s what inspired me to add one to the centerpieces.

The prizes for the shower were made with cute little heart jars that I found at a local craft store and filled with purple M&M’s. I then stamped a heart and flower from the Punched Potpourri Level 1 Hostess stamp set and punched them out using Stampin’ Up!’s coordinating Heart and Boho Blossom punches. I adhered them with sticky strip to keep them intact. The ribbon I used is a retired Stampin’ Up! organdy ribbon I kept on hand because I love them so much. Unfortunately it is no longer available for purchase. Hint, Hint to Stampin’ Up! to please bring back the organdy ribbon!  I will be posting the wedding invitation as soon as I can get a good pic of it, so be sure to check back in later!

Published in: on November 19, 2010 at 10:44 am  Comments (2)  
Tags: , , ,

Spring/Easter Scrapbooking Layouts

Here are the scrapbooking layouts for my Spring Stamp Camp which will take place on Tuesday, March 16 from 7-10 p.m.  The same layouts will also be available for all the ladies who will be attending the Sophisticated Socials Ocean City Crop the weekend of March 19-21.  Don’t forget to register by Saturday, March 13 by sending me an e-mail to sweadon@hotmail.com.

The first layout shown is an Easter two-page layout featuring the Lovely Letters Alphabet and the cute little Chocolate Bunny from the Mini Occasions catalog. 
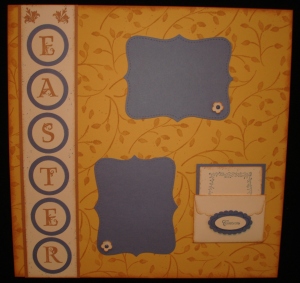
Easter Layout - Page 1

I wheeled the background of the paper using the Watercolor Vine and Creamy Caramel ink. The wheels are a quick tool for making your own special background paper and are easy to use.  I’ve only added a few photograph mats using the Top Note Die, but you may add additional ones if you have more photos. The little flowers on the corners are a nice attention to detail.

Journal - Page 1

I’ve also included a close up of the journal box on this page.

Some scrappers think you can’t use stamps to make a scrapbooking layout, but if you take this class, you will see how you can’t live without them! I learned to scrap this way – you can make all your own embellishments, especially if you have the right stamp sets. And one can never have too many stamps! LOL! Stampin’ Up! stamp sets are great because they coordinate with each other and usually feature one or two main images and a few for accents and background stamping.

Easter Layout - Page 2

The second page of the layout includes the Chocolate Bunny. This stamp is a definite keeper and the price is awesome for this little guy – only $7.95! I used the new Tiny Tags set to give him a cute little tag and attached it with some linen thread.

Here is a closeup of the bunny – doesn’t he look just delicious!

Chocolate Bunny - Page 2

Supplies:  Stamp Sets:  Chocolate Bunny, Lovely Letters, Tiny Tags, Itty Bitty Backgrounds and Matchbox Messages; Cardstock: So Saffron, Brocade Blue, Creamy Caramel and Very Vanilla; Inks:  Creamy Caramel, Brocade Blue, Basic Brown, Creamy Caramel Ink Catridge for Wheel; Accessories:  Jumbo Wheel Handle, Jumbo Watercolor Vine Wheel, Linen Thread, 5/8″ Brocade Blue Grosgrain Ribbon, Paper Piercing Tool & Mat Pack, Punches: 1-3/8″ Circle, 1-3/4″ Circle, Tiny Tags, Small Oval, Scallop Oval and Trio Flower, Rich Regal Brads – Brocade Blue, Stampin’ Sponges, Stampin’ Dimensionals, Sizzix Big Shot, Bigz Tope Note Die, and Bigz Scallop Envelope Die.

Spring will be here in one week and I can’t wait for it after one of the worst winters in years here in Maryland. Say goodbye to the snow and bring on the flowers along with the Shades of Spring:
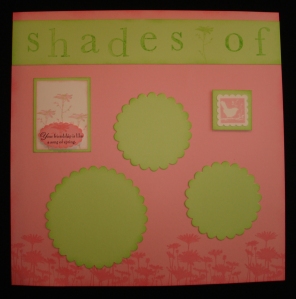
Shades of Spring Layout - Page 1

I used the Upsy Daisy stamp set to give me that great row of flowers at the bottom of my layout. Solid image stamps like this one are great for making borders.
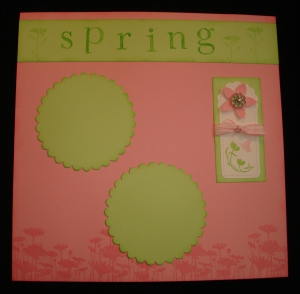
Shades of Spring Layout - Page 2

The Level 1 Hostess stamp set “Of the Earth” has wonderful images of Spring and I’ve been wanting to use it for awhile now, but needed just the right reason. And I think I found it in this layout. The images from this set made for beautiful embellishments and awesome additions to these pages.
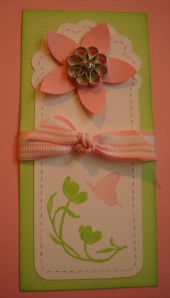
Spring Layout Tag Embellishment

You’ll find as you look through the Idea Book & Catalog that Stampin’ Up! has some of the best artists creating their images and there are many more like the ones featured in this Hostess set. I used the Sizzix Bigz Two Tags Die to make the white tag background on this particular embellishment. It’s the same one I used in my previous post to make the bookmark.

Friendship Embellishment

A technique I used on the flowers in the Friendship Embellishment is one called “Thumping”. You start out by inking up your main image in a light colored ink, then take a Stampin’ Marker of coordinating dark ink and while holding your stamp upside down “thump” the marker onto your image randomly. Then “huff” on your stamp to rewet the image and then stamp down onto your paper. I know it sounds silly, but it really does rewet the ink. This technique gives you the multi-colored image shown on the embellishment to the right.

I am excited to be doing some scrapbooking layouts at last as many of my customers have been asking for them. See you in class or down the ocean Ladies!

Supplies:  Stamp Sets:  Upsy Daisy, Of the Earth, Song of Spring and Schoolbook Serif Alphabet; Cardstock: Pretty in Pink, Gable Green, and Whisper White; Ink:  Pretty in Pink, Basic Black, Gable Green and Green Galore; Accessories:  Stampin’ Dimensionals, Stampin’ Sponges, Sizzix Big Shot, Sizzix Bigz Two Tag Die, Scallop Circle, Scallop Circles #2, Paper Piercer & Mat Pack, Filigree Brad, Pretty in Pink Striped Ribbon, Punches: 1/2″ Circle, Scallop Oval, Scallop Square, and 5-Petal Flower.

Published in: on March 11, 2010 at 6:02 pm  Comments (6)  
Tags: , , , ,

“Praying for You” – A Healing Time

Praying for You Medallion Card

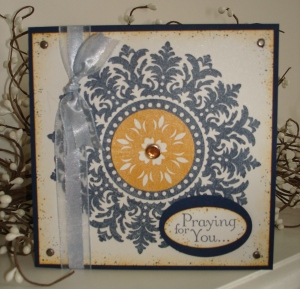
My friend and neighbor, Heather, asked me recently to make a card for her brother’s father-in-law who was just recently diagnosed with a brain tumor. I am happy to say that he underwent a successful surgery and is already home after just a short stay in the hospital. I hope this card helps to speed along his recovery. I used some beautiful wording from the “Thoughts and Prayers” stamp set and the inside of the card reads “Sending thoughts of love and praying for the Lord to sustain you with bright and restful days”.  I thought the wording from this stamp set was so appropriate for such a healing time.  This card was made while I attended a scrapbooking crop benefit event this past weekend in Federalsburg for the American Cancer Society.  I felt very inspired while making this card at such a benefit. There are so many people suffering from this dreadful disease and the money raised at this event will help them.  Susie Goodnight, my friend and one of my downline, attended this event with me. It was her very first crop and she made a ton of 6×6 pages with pictures of her 3 beautiful daughters and amazing granddaughter, Mackenzie. I was very impressed, especially with it being her very first crop. I met a lot of nice ladies at this crop and look forward to seeing them all again very soon.  I also was surprised when I won a door prize at the event which was a beautiful hand-knit PINK hat and scarf shown here. When attending a crop, I have a hard time deciding what supplies to take with me.  Even though I know I can’t take all my supplies with me, I sure try to. LOL! Unfortunately, I didn’t have the right color ribbon with me so I remembered this trick I had done before.  I used my Aqua Painter (which is a special brush pen filled with water and used for watercoloring) to dye my Whisper White Organza Ribbon.  To do this, place your ink pad between your fingers and press the lid down into the pad which will leave ink on the lid. Open your ink pad and drop a few drops of water from your Aqua Painter into the ink on the lid to dilute it.  Then brush your ink on to your ribbon. You can determine how light or dark you want your ribbon to be by how much ink you apply to it.  Then put your ribbon aside to air dry for about 10 minutes. 

Here are the supplies I used to make the Medallion card: Stamp Sets:  Thoughts and Prayers, Medallion, & Itty Bitty Backgrounds; Cardstock:  Night of Navy, Shimmery White; Ink:  More Mustard, Night of Navy; Accessories:  Vintage Brads, Large Oval and Wide Oval Punches, Circle of Fire Rhinestone Brad (Pumpkin), Aqua Painter, Whisper White Organza Ribbon, Stampin’ Sponges and Stampin’ Dimensionals.

Published in: on February 22, 2010 at 11:47 am  Leave a Comment  
Tags: , ,

Last Technique Tuesday Class

This past Tuesday was the last Technique Tuesday class and featured Paper Quilting.  It was also the last month for Hostess Club. I will miss teaching this class, but I will be posting new classes on my Stampin’ Up! Demonstrator Business Website next week , so be sure to check it out at www.sherahlweadon.stampinup.net.  Here are the cards we completed in class.

Love You Much

Chocolate Easter Bunny - Yum!

With all the cold weather we have had lately, I was really up for using some spring colors! I used the following Stampin’ Up! products to make these cards:

Card 1 – Chocolate Easter Bunny

Stamps:  Chocolate Bunny, Vintage Vogue, Well Scripted, Tiny Tags; Accessories:  Clear Mount Blocks, Shades of Spring Designer Series Paper, Cardstock: Whisper White, Orchid Opulence and Certainly Celery, Gold Cording, Old Olive 5/8″ Satin Ribbon, Punches: Scallop Trim Border, 1-1/4″ Square Punch, Large Oval and Medium Jewelry Tag, Sizzix Frame-Oval Scallop.

Card 2 – Love You Much

Stamps:  Well Scripted, Vintage Vogue;  Accessories: Sizzix Top Note Die, SU! Embosslits Beautiful Wings Die, Shades of Spring Designer Series Paper, Pretty in Pink 5/8″ Satin Ribbon, Large Oval Punch, and Clear Mount Blocks, Cardstock: Whisper White, Certainly Celery and Orchid Opulence.

Published in: on January 21, 2010 at 1:22 pm  Leave a Comment  
Tags: , , ,