Cupcakes!

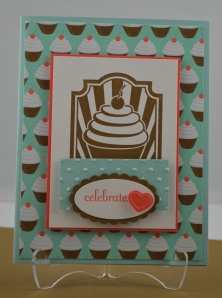
Don’t you just want to lick the frosting off all those cupcakes? This background paper is from the lovely pack of Specialty Designer Series Paper, Sweet Shop, two of which have embossed designs like the one from yesterday’s card (the lovely polka dots). But today’s card is just full of cupcakes! And the centerpiece – another cupcake from the Sweet Cake stamp set! Who wouldn’t want to celebrate with this card?!!

Supplies:  Stamp Set: Sweet Cake and Fabulous Phrases; Card Stock: Pool Party, Calypso Coral, Whisper White,  and Soft Suede; Ink: Soft Suede and Calypso Coral; Accessories:  Dimensionals, Big Shot, Perfect Polka Dots Textured Impressions Embossing Folder, Fashionable Hearts Embosslits Die, and Scallop Oval Punch.

Kindness Matters Binder Tutorial Now Available on Etsy!

You can now purchase the tutorial for my Kindness Matters class that I taught at retreat in Asheville, North Carolina. This class was very popular and I really enjoyed teaching it to a great bunch of ladies!  The binder holds eight 5-1/4″ square cards, 2 each of 4 different designs along with envelopes. The binder and cards can be easily adapted to any designer series paper and stamp set so it is great for classes or a stamp camp, and if you are not a demonstrator, just to make and give as a gift. The cost is $12.50. Here’s the link to my new Etsy Shop:  http://www.etsy.com/shop/Sherindipity

Mocha Morning for Dad

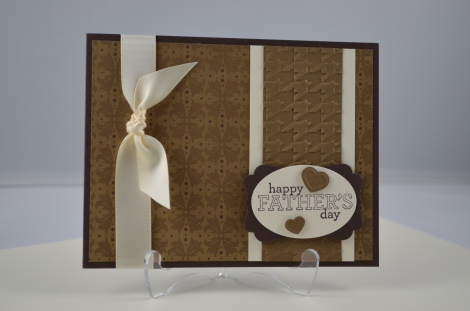
Quick post before I head out the door to go grocery shopping! Stampin’ Up!’s Mocha Morning Specialty Designer Series Paper is great for making men’s cards too, like this one for Father’s Day. The colors are great – Soft Suede and Early Espresso, and this was one quick card too. To make this card especially manly, I pulled out my Big Shot and embossed the strip of Soft Suede CS behind the wording with  the Houndstooth Textured Impressions Embossing Folder.  See you tomorrow with another Mocha Morning DSP card!

Supplies:  Stamp Set:  Delightful Dozen; Cardstock:  Early Espresso, Very Vanilla, and Soft Suede; Ink:  Early Espresso; DSP:  Mocha Morning Specialty; Accessories:  5/8″ Very Vanilla Satin Ribbon, Large Oval Punch, Decorative Label Punch, Dimensionals, Big Shot, Houndstooth Textured Impressions Embossing Folder.

Sugar & Spice – That’s what Girls are Made of!

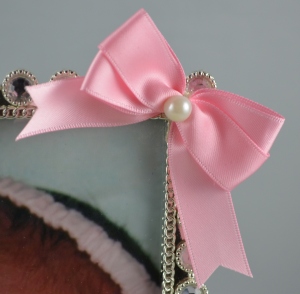
My neighbors, Phil and Mary, just had a beautiful baby girl, named Catherine Rose. I decorated this cute frame with some flowers to spice it up for their little beauty. Thanks Mary for letting me have my baby fix this morning. I used the new Mixed Bunch stamp set from the Mini Occasions catalog along with the coordinating Blossom Punch to make the flowers. I stamped the flower image in Pretty in Pink and punched out centers of the same color card stock. That’s what’s great about Stampin’ Up! products – coordinating colors in everything from ink, cardstock, markers, ribbons, buttons, etc. ! I added the new 8 mm pearls to the centers of the flowers and on the bow which I made with my Perfect Bow Maker. The smaller flowers were made with the Boho Blossom punch and the Basic Pearls. I added all the flowers to a base which I made out of chipboard covered in Twitterpatted DSP and hot glued to the front of the frame. I also modge podged the large flowers so I could form them to flip up on the edges. Both the chipboard and the modge podge gives the flowers stability as well. I used the Two Step Bird punch (wing section) to make the leaves out of Certainly Celery card stock and sponged them on the edge to give them some depth. I used my Perfect Bow Maker to make the Pretty in Pink Bow. What a sweet little girl full of sugar and spice!

Supplies: Stamp Set: Mixed Bunches; Cardstock: Whispering White, Pretty in Pink and Certainly Celery; DSP: Twitterpatted; Ink: Pretty in Pink and Certainly Celery; Accessories: Punches: 3/4″ Circle, Boho Blossom, Two Step Bird and the Blossom Punch, 5/8″ Pretty in Pink Satin Ribbon, Basic Pearls and 8 mm Pearls, Stampin’ Dimensionals, Linen Thread, Chipboard, Frame, Modge Podge and Glue Gun.

Published in: on February 28, 2012 at 5:23 pm  Leave a Comment  
Tags: , , ,

Twitterpated Dare to Dream!

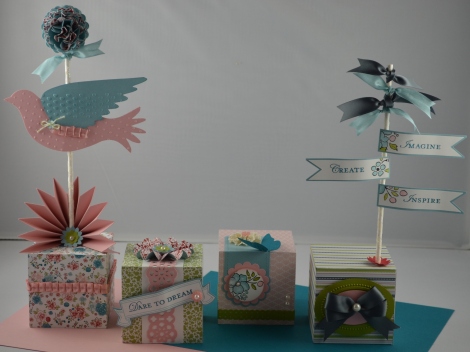
Remember in the Bambi movie, when all the animals in the forest became twitterpated, well that’s the way I feel about Stampin’ Up’s new Twitterpated Designer Series Paper from the new Mini Occasions Catalog! So much in love with it that I had to create something fun and creative for one of my upcoming classes entitled “Dare to Dream”.  I love all sides of the double-sided paper and had a hard time trying to decide which ones to use because I wanted to feature them all, but I had to draw the line somewhere. Some of the other items from the new Occasions Catalog are the Elegant Bird and Designer Rosette Bigz Dies, along with the wording from Loving Thoughts, the flowers from Bordering on Romance and the banner from Take it to Heart.  All that beautiful DSP was applied to Stampin’ Up!’s Decor Blocks. The application was very easy – just used a glue stick. I was able to hammer a screwdriver in the tops of the blocks easily to insert my Lollipop Sticks which were wrapped in Sticky Strip in a candy stripe pattern and then applied Dazzling Diamonds glitter to them to dress them up a bit. It might be hard to see in the picture, but they do dazzle in person. The Lollipop Sticks are kept in place with just a mini glue dot on the tip before insertion in the block.  If you would like to make one of these creative displays, I will be offering two classes in my home studio on March 8, 2012 – one at 10:00 am and the other at 6:00 pm.  The cost is $20.00 and you must RSVP and prepay by March 1.  See you in class!

Forever and Always

I recently attended a Tickled Pink Party held by one of my Sherindipity Stamper’s, Erika Clark. Erika is such a wonderful hostess and supplied us with great make & take projects and her yummy Ziti was to die for. She also had plenty of pink snacks on hand. Our swaps had to have pink incorporated somehow. Here is mine:

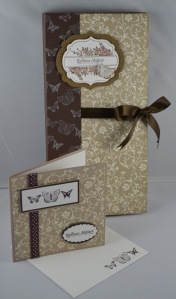
I will post the other attendees’ swaps and all the cute gifts we received from Erika on another day. You will definitely be impressed – everyone had such beautiful projects. But first let me tell you alittle about mine.  I made the wrap using Pretty in Pink CS and the measurements for the main piece are 4″x12″ with scorings at 3″, 7″ and 8″. The scoring at 3″ will be the front flap of your project and I embossed that flap using the new Adorning Accents Textured Impressions Embossing Folder which gave it that cute little scallop edging. Punched a trim using Island Indigo CS and the Scallop Trim Border Punch. I adhered the trim to the back of the front flap and Sticky Stripped it down closing my wrap. I adhered a strip of the new Twitterpatted Designer Series Paper to the top and ran a length of the new Blushing Bride pleated satin ribbon across it. Stamped my images using the Take it to Heart Stamp set. The same one I used on yesterday’s project. Hearts were punched out with the Hearts Collection Framelits Dies and the Heart Punch. Added some bling with the new 8 mm Large Pearl Basic Jewels and a Blushing Bride Designer Button from the Twitterpated collection. Forever and Always is from the new Loving Thoughts stamp set and I received the stamp set as part of my Leadership package.

 I filled my swaps with Rice Krispie heart treats that I made with my grandson, Andrew. We had fun making them, and as you can see he wanted to be completely hands on in the cooking process. We also cut out the centers and added one of the yummy gummy heart candies from yesterday’s project. Sorry I didn’t get a final pic, but we had to get them into the cello bags before they dried out. I used SU’s flat medium cello bags and they fit perfectly.

I can’t wait to cook in the kitchen with my other grandson, Owen, too but it will be alittle while yet.  Andrew will be 3 in March and I am so impressed with how smart he is already. Whenever we say goodbye to each other, we always say I love you and then we say Forever and Ever!  His sounds sorta like this: I love you Mimi! And then he says Foreva and eva! Melts my heart every time.

Love that kid and his smile!

Sorry about the sugar tasting Mommy! But we couldn’t resist.

He showed me some love in the pic with his cookie cutter! Isn’t he just adorable! I Heart him back. He actually even helped me with my swap applying dimensionals to the backs of the hearts.

On our way home from the party, I  took a pic in the town of St. Michaels – I found out the residents could purchase a heart for a $50 donation to a local charity and then they got to display their hearts on the telephone poles in town displaying their love to the world! What a great idea!

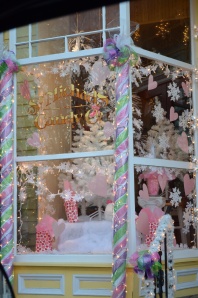
I also passed by a cute little candy store – do you think they may be wishing for snow on Valentine’s Day?

Supplies:  Stamp Sets:  Take it to Heart and Loving Thoughts; Cardstock:  Pretty in Pink, Island Indigo and Whisper White; DSP: Twitterpated;  Ink:  Blushing Bride; Marker:  Island Indigo; Accessories:  Big Shot, Hearts Collection Framelits Dies, Adorning Accents Textured Impressions Embossing Folder, Twitterpated Designer Buttons, Blushing Bridge 3/8″ Pleated Satin Ribbon, Sticky Strip, Scallop Trim Border and Heart Punches, Paper Snips, Basic Pearls and Large Pearl Basic Jewels, Mini Glue Dots, Linen Thread and Stampin’ Dimensionals.
Enchanting Swap!

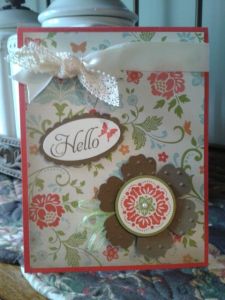
Camera is still MIA! Hoping it will reappear before I leave for Leadership this weekend. I don’t want to have to use my camera phone the whole trip so I am still searching. But I wanted to show you all my swap card so the camera phone it is.  I used the new Everyday Enchantment Designer Series paper because I needed something quick that would pack alot of elegance at the same time.  The Soft Suede flower is punched with the new Blossom Punch from the Mini Occasions Catalog. There is a matching stamp set to use with the punch called Mixed Bunch, but I didn’t purchase it as it comes as a part of my Leadership packet. I will feature it in another posting. However, so my blossom wouldn’t look naked I ran it through my Big Shot with the Perfect Polka Dots Embossing Folder to give it some texture. The center of my flower was stamped using a Sale-A-Bration stamp set called Fresh Vintage. This set coordinates with the Everday Enchantment Designer Series Paper. Both are available beginning January 24 in the new Sale-A-Bration catalog. Sale-A-Bration is a wonderful time to hostess a workshop! As Hostess you can earn FREE product in addition to the regular hostess benefits and as an attendee of a workshop with every $50.00 you purchase, you get FREE product! The Everyday Enchantment DSP and Fresh Vintage stamp set are two of the items you can get for FREE! My greeting is from another new stamp set you can get for FREE – it is called Elementary Elegance. It features a beautiful frame, two word greetings and some cute little stamps such as the butterfly featured next to my greeting. Pearls add a finishing touch to my butterfly and the center of my flower and some of the new 1/8″ Lucky Limeade Organdy Ribbon as leaves for my flower. Hope you enjoy!

Supplies:  Stamp Sets:  Elementary Elegance and Fresh Vintage; Cardstock:  Poppy Parade, Soft Suede, Lucky Limeade and Very Vanilla; Ink:  Poppy Parade, Soft Suede and Lucky Limeade; DSP: Everyday Enchantment; Accessories:  Blossom Punch, 1/2″, 1-3/8″ and 1-1/4″ Circle Punches, Oval and Oval Scallop Punches, Basic Pearls, Stampin’ Dimensionals, Very Vanilla 5/8″ Satin Ribbon and Lace Crochet Trim, 1/8″ Lucky Limeade Organdy Ribbon.

Published in: on January 12, 2012 at 11:34 am  Comments (1)  
Tags: , ,

All Wrapped Up in a Pretty Package!

I love wrapping Christmas presents! Don’t you?  And doesn’t this card look just lovely as a glittery package? Stampin’ Up!’s awesome Silver Glimmer paper makes it just perfect combined with the Cherry Cobbler ribbon. I’ve adorned the little bells with rhinestones and outlined them with two-way glue and applied Dazzling Diamonds glitter to really make them shine.

Speaking of gifts I am off to finish up the last of my Christmas shopping for my family. We are having Christmas at Thanksgiving this year since my daughter, Lindsey, is due to deliver my second grandchild on December 20.  I better get going – so much to do!

Be sure to click on the shopping cart on my right side bar to check out the Stampin’ Up! On-Line Extravaganza with specials up to 60% off and two items marked down for 24 hours only – the Simply Scored Tool and the Sweet Pressed Cookie Stamps! This main promotion runs from November 21 through November 30!  Check out my exclusive special on my Facebook page as well. While there, if you have not already “Liked” my page, please do so! That way you can see daily postings! Thanks!

Supplies:  Stamp Sets:  Bells & Boughs; Cardstock:  Cherry Cobbler, Whisper White and Silver Glimmer Paper; Ink:  Cherry Cobbler, Garden Green and More Mustard; Accessories:  Paper Snips, Rhinestones, XL Oval Punch, Oval Scallop Punch, Cherry Cobbler Seam Binding Ribbon, Two-Way Glue, Dazzling Diamonds, Filigree Brads, Mini Glue Dots, Stampin’ Dimensionals, and Linen Thread.

Published in: on November 21, 2011 at 12:54 pm  Comments (2)  
Tags: ,

Rember the Soldiers this Holiday Season!

My neighbor, Jillian, recently approached me about a citizenship project she was doing with her son, Cooper’s, kindergarten class and asked me if I could come up with something we could do for the soldiers overseas. While away at retreat last weekend I came up with an easy card idea that all the kids could do and Jillian took them into her son’s class this week to complete. My daughter, Lindsey, who’s husband, Jake, has been to Iraq twice and once to Afghanistan gave me the name of a soldier in her husband’s unit we could send them to. It was very heartwarming to see what the kids drew and wrote in their cards for Scott. The teacher also asked them if there was anything else they wanted to add the inside of the cards so that is her writing in the top inside of each card.  My card is pictured above and you can check out the kids’ cards in a slide show below.  It was an inspiring project for us all. We also sent a couple of boxes filled with goodies for Scott to share with his buddies! Jillian and I definitely want to try this again. If you would like to send a holiday card to Scott or members of his unit, I am sure they would be delighted to get even more! Please leave me your e-mail in the comment section below and I would be happy  to forward you his address.  Aren’t the kids’ cards just adorable!  Each one of them put the stars in different places on the cards – too cute! Jillian and I couldn’t stop aaaawwwwing with each one we read.

This slideshow requires JavaScript.

Supplies: 

Kids’ Card – Cardstock:  Real Red and Brushed Gold; Accessories:  Large and small star punches (retired), “Hero” Stampin’ Around Jumbo Wheel, Stampin’ Around Jumbo Wheel Handle, Basic Black Jumbo Ink Cartridge and Glue Stick.

My Card:  This was a card I made last year for my display and some of the products used in the making of this card are now retired, but there are similar ones in the new catalog that can be substituted. Not sure of the substitute – leave a comment below and I will let you know which product).  Stamp Set:  Courage and the dove stamp from A Wish for Peace (retired) and Itty Bitty Backgrounds; Cardstock:  Old Olive and Very Vanilla;  Ink:  Real Red, Brilliant Blue (retired), Old Olive, and Creamy Caramel (retired); Accessories:  Gold Brads, Stampin’ Sponges, “Hero” Stampin’ Around Jumbo Wheel, Stampin’ Around Jumbo Wheel Handle, Jumbo Old Olive Cartridge (retired), and Aqua Painter.

Published in: on November 19, 2011 at 4:04 pm  Comments (1)  
Tags: , , , ,

Come to Bethlehem

I’m working into the wee hours at my Stamp/Scrap Retreat on next week’s Holiday Stamp A Stack cards and here is one of the cards which will be featured in that class. The “Come to Bethlehem”stamp set features the Three Wise Men as they are guided by a star to the New Born King. Perfect Plum along with our Brushed Gold Cardstock makes for sheer elegance and is definitely fit for a king! I love our Brushed Gold Cardstock because the color is throughout the paper even when cut – no white edges showing on this paper. The main image and the saying is stamped with Versamark Ink and embossed with Stampin’ Up!’s new Pewter Embossing Powder featured in the Holiday Mini Catalog.  I thought the right side of the card was looking alittle bare so I added the gold on gold strip which has been punched with the Scallop Trim Border punch and then finished off that corner with some Basic Pearls.  My last two Holiday Card Stamp A Stacks will be held on November 17 and 22 from 6-10 p.m.  See you there!

Supplies:  Stamp Set: Come to Bethlehem; Cardstock:  Perfect Plum, Brushed Gold, and Whisper White; Ink:  Perfect Plum and Versamark; Accessories:  Decorative Label Punch, Modern Label Punch, Basic Pearls, Mini Glue Dots, Scallop Trim Border Punch, Perfect Plum 3/8″ Taffeta Ribbon, 5/8″ Whisper White Organza Ribbon, Stampin’ Dimensionals, Pewter Embossing Powder, and Heat Embossing Gun.

Published in: on November 12, 2011 at 2:03 am  Leave a Comment  
Tags: , , , ,

Asheville, NC Stamp/Scrap Retreat

I finally arrived at my Stamp/Scrap Retreat yesterday afternoon. I flew into the Greenville/ Spartansburg Airport in South Carolina and then rented a car to carry me and all my STUFF to the Ridgecrest Retreat Center in Asheville, NC. The drive to the retreat center was beautiful with all the changing foliage along the way. I managed to squeeze my clothing and all my supplies into two large suitcases and one small carry-on.  All arrived safely without incidence, except for a brief inspection of one of my suitcases by the TSA as indicated by this tag. They were probably wondering what all those scissors and blades were doing in there. LOL!  I have been having alot of fun meeting new friends, sharing ideas and attending classes.

I’ve included some of the projects I’ve been working on so far – holiday gift tags using the Letters to Santa Designer Series Paper and a gift card that will be offered  in my Holiday Gift Card Stamp a Stack on December 8 and 15 from 6-10 p.m. Take one class or both. Cost is $20.00 for each class. This gift card holder is perfect for the men in your life. Very manly with the woodgrain paper from the Frostwood Lodge Designer Series Paper pack along with the stately deer from the Winter Post stamp set. When open, the gift card sits in a pocket on the left and your word saying is on a small card to the right.

Will try to post again later tonight with more projects from my retreat. Thanks for checking in with me!

Tag Supplies:  Stamp Sets:  Bright Hopes, Winter Post, Tags Til Christmas and Short & Sweet; Cardstock:  Early Espresso, Cherry Cobbler, Whisper White, Marina Mist, and More Mustard; Ink:  Early Espresso and Cherry Cobbler; DSP:  Letters to Santa; Accessories: Big Shot, Two Tags Die, Punches: Extra Large Oval, Boho Blossom, Decorative Label, 1-3/4″ Scallop Circle, 1/8″, 1-1/4″ & 1-3/8″ Circles and Postage Stamp, Cherry Cobbler and Early Espresso Quilted Satin Ribbon, Chantilly Crochet Trim, Basic Pearls, Linen Thread, Rhinestones, Sponge Daubers, Distressing Tool, Stampin’ Dimensionals.

Manly Gift Card:  Stamp Set:  Winter Post and Christmas Greetings; Cardstock:  Early Espresso, Cherry Cobbler and Winter White; Ink:  Cherry Cobbler and Early Espresso; DSP:  Frostwood Lodge; Accessories:  Extra Large Oval Punch, Early Espresso 1/8″ Taffeta Ribbon, Early Espresso Quilted Satin Ribbon, Big Shot, Petals A Plenty Textured Impressions Embossing Folder, Stampin’ Dimensionals and Sponge Dauber.

Wish Big!

These big dots say it all! Stampin’ Up!’s Red Glimmer Paper is not just for your holiday or valentine projects. Think outside the box when you work with this paper and use it for all your papercrafting projects.  This card came together quite easily with just one strip and a few punched circles of the Red Glimmer, but boy does it make an impact on this birthday card along with the Tempting Turquoise cardstock.

Supplies:  Stamp Set: Word Play; Cardstock:  Whisper White and Tempting Turquoise; Ink:  Tempting Turquoise; DSP: Brights Collection Paper Stacks; Accessories: Red Glimmer Paper, Gold Brads, Stampin’ Dimensionals, and Punches: 1″ Circle, 2-1/2″ Circle, 2-3/8″ Scallop Circle, and 1/16″ Circle.

Published in: on September 26, 2011 at 4:22 pm  Comments (1)  
Tags: ,

A Pumpkin With Spice!

Spice Cake Designer Series Paper is filled with so much spice it’s overflowing from this cute  floral display I made for my hair stylist, Ashley at West Wing Salon & Spa.  She does an amazing job on my hair so I wanted to make something nice to let her know I appreciate her.  I found this beautiful little ceramic pumpkin container at my local grocery store in three different colors – orange, olive and purple. I can’t wait to to fill the remaining two containers with matching flowers. I’ll have to check my paper stash and see what I can come up with.

The flowers are made using the 1-3/4″ Scallop Circle Punch.  For instructions on how to make these flowers see my November 19, 2010 posting by putting “shower” in the search engine on my right sidebar. I made several of those beautiful bouquets for my daughter’s wedding shower. My scallop punch definitely got a workout when I made them. LOL!

I added an oversized styrofoam ball to my ceramic pumpkin pushing it in as far as it would go to secure it and began inserting the flowers into the ball using large corsage pins.  In the past I have also attached the flowers using a low temp glue gun, but by using the pins avoided the mess this time.  Stamped my tag with “Life is a matter of moments” stamp and attached it with linen thread to my bow and using the large corsage pins inserted the bow into the flower arrangement. Because of the pretty blue pearl on the end of the corsage pin I didn’t mind having it show.

Shop my on-line store to purchase any of the Stampin’ Up! products shown here by clicking on the mini shopping cart in the right sidebar!

Supplies:  Stamp Set:  Elements of Style; Cardstock: More Mustard and Soft Suede for flowers, Very Vanilla and Early Espresso for the tag; Ink:  Early Espresso; Designer Series Paper:  Spice Cake; Accessories:  Neutral Brads, 5/8″ Very Vanilla Satin Ribbon, Linen Thread, Punches:  Large Oval, Scallop Oval and 1/16″ Circle. Non-Stampin’ Up!:  floral container and corsage pins.

Published in: on September 23, 2011 at 10:46 am  Comments (2)  
Tags: , , ,

Snowbuddy Likes You!

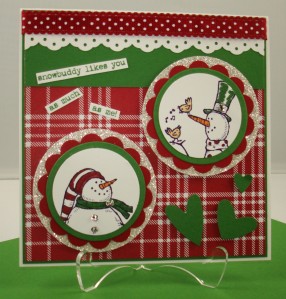
These two snowmen are so much fun! That’s because they are part of the Snow Much Fun stamp set in the 2011-2012 Idea Book & Catalog. This is Card #2 which was done as part of my swaps with my Sherindipity Stampers Group featuring stamp sets from the New Idea Book and the Holiday Mini Catalog. Card #1 was posted on September 9. Card #3 will be posted on Thursday, so check back again!  I used the same setup from a previous card I posted on August 8 – Holiday Dreaming, but changed my Frostwood Lodge Designer Paper from green to red and made my card alittle larger at 5-1/4″ square. I love this size – it allows you to add just alittle more to each card! I also had room to add a little more love to it – check out the three hearts from the Heart to Heart punch.

Supplies:  Stamp Set:  Snow Much Fun; Cardstock:  Whisper White, Garden Green, and Cherry Cobbler; Ink:  Garden Green; Markers:  Garden Green, Cherry Cobbler, So Saffron, and Pumpkin Pie, Designer Series Paper:  Frostwood Lodge; Accessories:  1/2″ Cherry Cobbler Scallop Dots Ribbon, Heart to Heart Punch, Stampin’ Dimensionals, Eyelet Border Punch, 2-3/8″ Scallop Circle Punch, 1-3/4″ Circle Punch, 2-1/2″ Circle Punch, Circles #2 Die, Big Shot, Silver Glimmer Paper and Rhinestones.

Published in: on September 20, 2011 at 8:00 am  Comments (1)  
Tags: , , ,

Holiday Horsin’ Around!

Isn’t this just the cutest little Hobby Horse ever!  I was inspired by Jackie Topa’s hobby horse on Stampin’ Connection, the stamper’s showcase on the demonstrator website.  The top of the horse is actually a holiday stocking stamped from Stampin’ Up!’s new Stitched Stockings stamp set and then punched out with the coordinating Stocking Builder Punch. I love it!  His mane is made from Early Espresso Baker’s Twine and the stick itself is a little red coffee stirrer that I covered in sticky strip and then dipped in Dazzling Diamonds glitter. How’s that for being creative?! I then wrapped the stick in Early Espresso 1/8″ Taffeta Ribbon. And how about that Red Glimmer Paper!! Absolutely gorgeous!

Supplies:  Stamp Set:  Stitched Stockings and Four the Holidays; Cardstock:  Early Espresso, Crumb Cake, and Very Vanilla; Ink:  Early Espresso; Accessories:  Big Shot, Perfect Polka Dots Textured Impressions Embossing Folder, Stocking Builder Punch, 1/8″ Early Espresso Taffeta Ribbon, Basic Pearls, Early Espresso Bakers Twine, Sticky Strip, Stampin’ Dimensionals, Dazzling Diamonds, Red Glimmer Paper and Red Coffee Stirrer.

Published in: on September 19, 2011 at 8:00 am  Comments (9)  
Tags: , , , ,