Retired Accessories List is Here!
Be sure to check out the newly released Retired Accessories List for some great deals! But don’t delay because they won’t last long. There are some awesome markdowns so grab your credit card and get them before they are gone! If you would like me to send you a PDF file of the list, please comment with your e-mail and I would be happy to do so.
Retired Stamp List is Here!

There are over 300 stamp sets retiring from the 2011-2012 catalog, and this is your chance to get them before they’re gone. Many products are only available while supplies last, so be sure to get your orders in early!
Check out the Retired Stamps List at the bottom of the Promotions page on my demonstrator website! The Retired Accessories List will be available on April 25.
Betsy’s Going Away Tea Party
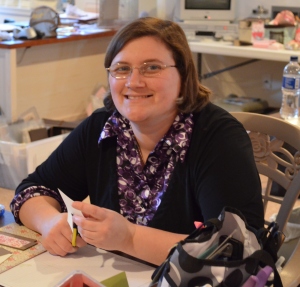 One of my good friends and downline, Betsy, is moving to Florida so I gave her a going away tea party. Most of the ladies from my Sherindipity Stampers group was in attendance for some great tea party make & take projects, food and fun.
Betsy was one of the first people I met when I moved to the Eastern Shore 7 years ago. It took a while but she finally took the plunge and became one of my Sherindipity Stampers and has been going full speed ahead since. She is a great networker so I know she will have no problem starting up her business once she gets to Florida. She recently recruited two new demonstrators in between packing up her house in MD, looking for a new house in FL, traveling back and forth and taking care of 3 kids and a husband. She amazes me sometimes how much she manages to stuff in one day. Betsy girl, I know you will do just fine.
Here are two of the projects we made at the party as well as a pic of the first chocolate cake pops I ever made. They were rich, but oh so Yummy! The Tea for Two project is one of Stampin’ Up!’s clear stamp cases stuffed with pockets of different types of teas and Ghiradelli chocolates. The second is a cute little teacup card. 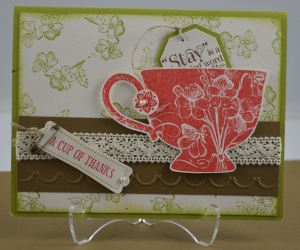 Both projects were made using the Tea Shoppe stamp set from the Occasions Mini Catalog. This catalog is set to expire on April 30 so be sure to get your Tea Shoppe stamp set now. The DSP used is from the Everyday Enchantment that ended with Sale-A-Bration in March, but you can adapt any DSP to be used.
Bon Voyage Betsy! I will miss you but thanks to Facebook we can always be in touch until you make your trips back home to see family in MD.
Mocha Morning Graduate
 Spring is in the air, but the end of the school year will be here before you know it. So here is a little Mocha Morning for your graduate! The wording on this card is from Word Play and is one of my favorite stamps from the set and very versatile – works for graduation, new job or retirement. And the Early Espresso ribbon and the mini library clip definitely are perfect embellishments for this card. Get your Mocha Morning Specialty DSP before it’s gone!
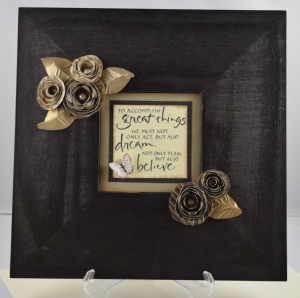 Here’s another project using this great DSP from a class I took at the North Carolina Retreat. My friend Bonnie Henderson taught this beautiful Frame Class and I really loved making the flowers out of Mocha Morning Specialty DSP. Check out the texture on the leaves – she showed us how to use the Spider Web Textured Impressions Embossing Folder to make the veins on the leaf. So cool!
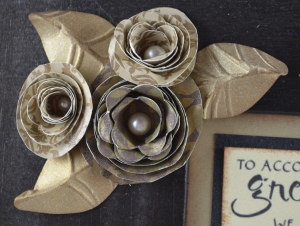
Supplies for Card: Stamp Set: Word Play; Cardstock: Textured Crumbcake, Soft Suede, Early Espresso, Whisper White; Ink: Early Espresso; DSP: Mocha Morning Specialty; Accessories: 1/8″ Early Espresso Taffeta Ribbon, Mini Library Clip, Dimensionals, Big Shot, Square Lattice Textured Impressions Embossing Folder.
SPECIAL ANNOUNCEMENT: The Retirement List will be out on April 15th, please be sure to check out this list on my demonstrator website by clicking on the “shop now shopping cart” button at the top right sidebar of my blog – it will take you to my site. These items will start to go quick so don’t delay if there are items you want from the 2011-2012 Idea Book & Catalog.
Also the Clearance Rack has added over 50 new items. You won’t want to pass up these items either. Fabulous markdowns!
Mocha Morning Continues!
 Here are some more projects using the Mocha Morning Speciality DSP. What’s so special about a specialty DSP you say? Well, usually there are one or two sheets that have something special about them like flocking, raised images, glitter, etc. Mocha Morning has two different sheets that have beatiful black flocking on them so I thought I would show you two cards that have this feature. Here’s a close up pic of the flocking and the little embossed butterfly.
 Another Mocha Morning card with that specialty flocking on it is this one with a favorite saying from the “Style Beautiful” stamp set. That wording says it all. These two cards are also easy and quick to make but pack a punch in the style arena.
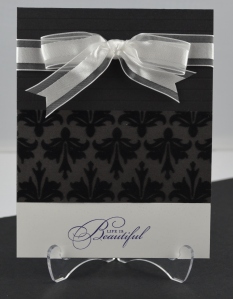
Supplies: Card 1 – Stamp Set: Word Play; Cardstock: Crumb Cake Plain and Textured, Whisper White, and Basic Black; DSP: Mocha Morning Specialty; Ink: Basic Black; Accessories: 5/8″ Basic Black Satin Ribbon, Dimensionals, Big Shot, Perfect Polka Dots Textured Impressions Embossing Folder, Labels Collection Framelits Dies, Beautiful Wings Embosslits Die, and Basic Pearls. Card 2 – Stamp Set: Style Beautiful; Cardstock: Basic Black and Whisper White; Ink: Basic Black; Accessories: Whisper White 5/8″ Organza Ribbon.
Mocha Morning for Dad
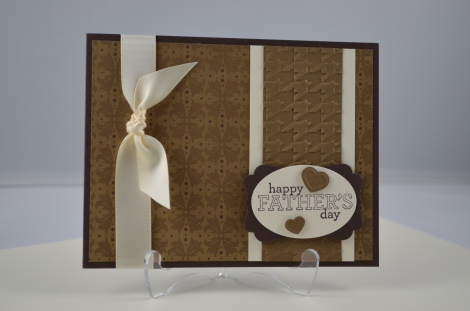 Quick post before I head out the door to go grocery shopping! Stampin’ Up!’s Mocha Morning Specialty Designer Series Paper is great for making men’s cards too, like this one for Father’s Day. The colors are great – Soft Suede and Early Espresso, and this was one quick card too. To make this card especially manly, I pulled out my Big Shot and embossed the strip of Soft Suede CS behind the wording with the Houndstooth Textured Impressions Embossing Folder. See you tomorrow with another Mocha Morning DSP card!
Supplies: Stamp Set: Delightful Dozen; Cardstock: Early Espresso, Very Vanilla, and Soft Suede; Ink: Early Espresso; DSP: Mocha Morning Specialty; Accessories: 5/8″ Very Vanilla Satin Ribbon, Large Oval Punch, Decorative Label Punch, Dimensionals, Big Shot, Houndstooth Textured Impressions Embossing Folder.
It’s Going to be a Mocha Morning Kind of Week!
 So much going on right now and I haven’t had a chance to post lately, but while brainstorming last night I remembered I hadn’t shared my Mocha Morning cards from my North Carolina retreat display board on my blog yet. So that’s what I’ll be doing all this week. After you see these cards, you will realize that if you haven’t purchased this lovely Stampin’ Up! Specialty Designer Series Paper yet, you must. But you will have to do it soon as it will be retiring as all good Stampin’ Up! designer series papers do when a new catalog comes out. And that will be early this year, with the new catalog making its debut in June instead of July. So I hope you enjoy my Mocha Morning DSP creation today and keep coming back for more the rest of the week. This is my favorite of the bunch!
Here is a pic of me and my friend, Bonnie Henderson, another SU! demonstrator, who organized the retreat that I attended last month in Asheville, NC . Bonnie was also my roommate and we had so much fun – staying up until the wee hours of the morning laughing at each other’s escapades from years long ago! Thanks Bonnie for allowing me to teach at your retreat and I look forward to doing so again in the fall.
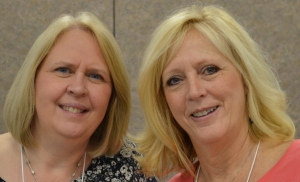 Here is another pic of a great bunch of gals that attended one or both of my classes that I taught at retreat. They are referred to as the Tennessee Gals. They were so fun and willing to share all their ideas with me as well as including me in with their lunch and dinner groups.
Two of my friends that I met at retreat last fall, Kathy Williams and Sandy Sluder, both from Tennessee, were unable to attend this spring retreat so I decided to swing up through Tennessee on my way back home to Maryland and had dinner with them at the Chop House in Kingsport and got to share all my cards and ideas with them that we did at retreat. It was such a pleasant evening catching up with each other. For some reason my flash was not working on my camera and the room was so dark those pics did not turn out so I don’t have them to share with you. But here is one of the Tennessee mountains that I took when I was on my way to meet up with them. Such a pretty state!
Supplies:
Stamp Sets: Bordering on Romance (Mini Occasions – last day to order April 30) and Party Time; Cardstock: Textured Crumb Cake, Soft Suede, Very Vanilla and Early Espresso; Ink: Crumb Cake, Basic Black, Lucky and Limeade; Specialty Designer Series Paper: Mocha Morning; and Accessories: Big Shot, Square Lattice Textured Impressions Embossing Folder, Linen Thread, Basic Pearls, Aqua Painter, Dimensionals and Itty Bitty Backgrounds (retired).
Mocha Morning Valentine
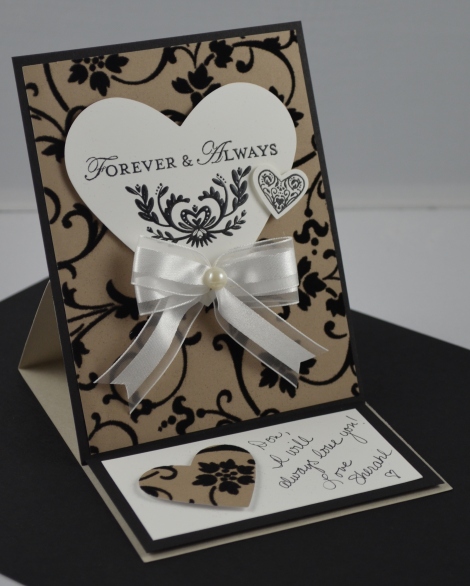 This is a just a quick blog entry to show you the card I made for my hubby for Valentine’s Day. It is an Easel Card and was very easy to make. I viewed Brian Pilling’s video from Stampin’ Up! to get all my measurements and scoring lines for construction. This card went together quickly especially when I could use my Simply Scored Tool to make all my scoring lines. Easel cards are great because it allows you to display your card creation, but it can also fold flat for mailing.
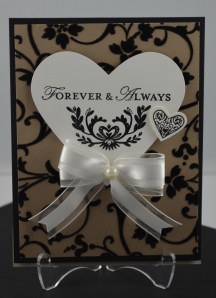 No special mailing required. My hubby loved the fact that he could keep the card out for display on his dresser. I used my Perfect Bow Maker to make the bow on this card.
Supplies: Stamp Sets: Loving Thoughts, Take It To Heart and Style Beautiful; Cardstock: Whisper White, Crumbcake, and Basic Black; DSP: Mocha Morning; Ink: Craft Black Ink; Accessories: Simply Scored Tool, Embossing Heat Gun, Clear Embossing Powder, Large Pearl Basic Jewels (8 mm), Hearts Collection Framelit Dies, Big Shot, 5/8″ Whisper White Organza Ribbon, Stampin Dimensionals.
Here is Brian Pilling’s Easel Card Video from Stampin’ Up to help you with measurements and construction of an Easel Card.
Forever and Always
I recently attended a Tickled Pink Party held by one of my Sherindipity Stamper’s, Erika Clark. Erika is such a wonderful hostess and supplied us with great make & take projects and her yummy Ziti was to die for. She also had plenty of pink snacks on hand. Our swaps had to have pink incorporated somehow. Here is mine:
I will post the other attendees’ swaps and all the cute gifts we received from Erika on another day. You will definitely be impressed – everyone had such beautiful projects. But first let me tell you alittle about mine. I made the wrap using Pretty in Pink CS and the measurements for the main piece are 4″x12″ with scorings at 3″, 7″ and 8″. The scoring at 3″ will be the front flap of your project and I embossed that flap using the new Adorning Accents Textured Impressions Embossing Folder which gave it that cute little scallop edging. Punched a trim using Island Indigo CS and the Scallop Trim Border Punch. I adhered the trim to the back of the front flap and Sticky Stripped it down closing my wrap. I adhered a strip of the new Twitterpatted Designer Series Paper to the top and ran a length of the new Blushing Bride pleated satin ribbon across it. Stamped my images using the Take it to Heart Stamp set. The same one I used on yesterday’s project. Hearts were punched out with the Hearts Collection Framelits Dies and the Heart Punch. Added some bling with the new 8 mm Large Pearl Basic Jewels and a Blushing Bride Designer Button from the Twitterpated collection. Forever and Always is from the new Loving Thoughts stamp set and I received the stamp set as part of my Leadership package.
 I filled my swaps with Rice Krispie heart treats that I made with my grandson, Andrew. We had fun making them, and as you can see he wanted to be completely hands on in the cooking process. We also cut out the centers and added one of the yummy gummy heart candies from yesterday’s project. Sorry I didn’t get a final pic, but we had to get them into the cello bags before they dried out. I used SU’s flat medium cello bags and they fit perfectly.
 I can’t wait to cook in the kitchen with my other grandson, Owen, too but it will be alittle while yet. Andrew will be 3 in March and I am so impressed with how smart he is already. Whenever we say goodbye to each other, we always say I love you and then we say Forever and Ever! His sounds sorta like this: I love you Mimi! And then he says Foreva and eva! Melts my heart every time.
Sorry about the sugar tasting Mommy! But we couldn’t resist.
He showed me some love in the pic with his cookie cutter! Isn’t he just adorable! I Heart him back. He actually even helped me with my swap applying dimensionals to the backs of the hearts.
On our way home from the party, I took a pic in the town of St. Michaels – I found out the residents could purchase a heart for a $50 donation to a local charity and then they got to display their hearts on the telephone poles in town displaying their love to the world! What a great idea!
I also passed by a cute little candy store – do you think they may be wishing for snow on Valentine’s Day?
Supplies: Stamp Sets: Take it to Heart and Loving Thoughts; Cardstock: Pretty in Pink, Island Indigo and Whisper White; DSP: Twitterpated; Ink: Blushing Bride; Marker: Island Indigo; Accessories: Big Shot, Hearts Collection Framelits Dies, Adorning Accents Textured Impressions Embossing Folder, Twitterpated Designer Buttons, Blushing Bridge 3/8″ Pleated Satin Ribbon, Sticky Strip, Scallop Trim Border and Heart Punches, Paper Snips, Basic Pearls and Large Pearl Basic Jewels, Mini Glue Dots, Linen Thread and Stampin’ Dimensionals.
Take it to Heart
I’m back! I never did find my old camera so I finally had to buy a new one and now I have lots of projects to share! This project was a gift for my hair dresser, Ashleigh, at West Wing Salon. She’s such a sweetie! I am meeting with her and her mom Friday evening to plan her wedding invitations. I can’t wait. She has a tight wedding budget, so I told her how she could save money on her invites. She’s planning on having a workshop with all the ladies in her family and her bridal party to earn all the products she needs to make her invitations with. Then I will show her how to make them and she will save herself oodles of money and will have the great memory of making the invites herself.
 So this is the cute jar of goodies I gave her this morning – just in time for Valentine’s Day! I used the “Take It to Heart” stamp set featured in the new Mini Occasions Catalog as well as the Hearts Collection Framelits. Love the framelits – they are thin, wafer-like dies that perfectly cut out my stamped image of the boy and girl on the bicycle. There are 6 different sizes of hearts. The jar I used is a Collection Elite mini Ball jar that I purchased at the Big “W” and filled with yummy gummy heart candy I got from my local Amish Market. Wow, if you ever want to see a collection of candy you’ve got to go there!
Since the Ball jar lids are in two pieces. I put a couple of mini glue dots between the twist frame and the lid to hold it together.  I then ran a length of Sticky Strip around the top edge of the lid and then ruffled my satin ribbon around the top as shown in the next picture, pinch pleating as I rounded the jar. I added some doubled up Dimensionals to the center of the lid. The Dimensionals will keep the top cover that I will apply in the center level with the ribbon around the edge.
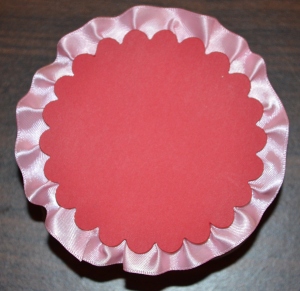 I then used the #2 Circle Scallops Die and Real Red CS to cut a top for my jar. It fit perfectly! I then stamped my main image in Real Red Ink and used the Framelit Die to cut out my image. The small assorted hearts are cut from the new Fashionable Hearts Embosslits Die.
Do you like my perfect bow? Well, I learned a trick at Leadership Conference I will share with you later this week. I’ll never freehand another bow again!
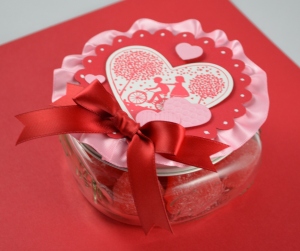 Here’s an even better close up of the top of the jar.

Supplies: Stamp Set: Take it To Heart; Cardstock: Real Red, Whisper White and Pretty in Pink; Ink: Real Red; Accessories: Big Shot, Hearts Collection Framelits Dies, Fashionable Hearts Embosslits Die; #2 Circle Scallop Die, Dimensionals, 5/8″ Pretty in Pink Satin Ribbon, Sticky Strip; Non-Stampin’ Up! Supplies: Elite Collection Ball Jars and Candy.
Enchanting Swap!
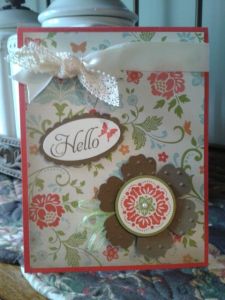 Camera is still MIA! Hoping it will reappear before I leave for Leadership this weekend. I don’t want to have to use my camera phone the whole trip so I am still searching. But I wanted to show you all my swap card so the camera phone it is. I used the new Everyday Enchantment Designer Series paper because I needed something quick that would pack alot of elegance at the same time. The Soft Suede flower is punched with the new Blossom Punch from the Mini Occasions Catalog. There is a matching stamp set to use with the punch called Mixed Bunch, but I didn’t purchase it as it comes as a part of my Leadership packet. I will feature it in another posting. However, so my blossom wouldn’t look naked I ran it through my Big Shot with the Perfect Polka Dots Embossing Folder to give it some texture. The center of my flower was stamped using a Sale-A-Bration stamp set called Fresh Vintage. This set coordinates with the Everday Enchantment Designer Series Paper. Both are available beginning January 24 in the new Sale-A-Bration catalog. Sale-A-Bration is a wonderful time to hostess a workshop! As Hostess you can earn FREE product in addition to the regular hostess benefits and as an attendee of a workshop with every $50.00 you purchase, you get FREE product! The Everyday Enchantment DSP and Fresh Vintage stamp set are two of the items you can get for FREE! My greeting is from another new stamp set you can get for FREE – it is called Elementary Elegance. It features a beautiful frame, two word greetings and some cute little stamps such as the butterfly featured next to my greeting. Pearls add a finishing touch to my butterfly and the center of my flower and some of the new 1/8″ Lucky Limeade Organdy Ribbon as leaves for my flower. Hope you enjoy!
Supplies: Stamp Sets: Elementary Elegance and Fresh Vintage; Cardstock: Poppy Parade, Soft Suede, Lucky Limeade and Very Vanilla; Ink: Poppy Parade, Soft Suede and Lucky Limeade; DSP: Everyday Enchantment; Accessories: Blossom Punch, 1/2″, 1-3/8″ and 1-1/4″ Circle Punches, Oval and Oval Scallop Punches, Basic Pearls, Stampin’ Dimensionals, Very Vanilla 5/8″ Satin Ribbon and Lace Crochet Trim, 1/8″ Lucky Limeade Organdy Ribbon.
The Best Christmas Present Ever!
 I received the best Christmas present ever and no paper packaging was required. My dear daughter, Lindsey, and her husband, Jake, gave me a beautiful new grandson named Owen Michael Gigliotti on December 20, 2011 at 12:14 p.m. weighing in at 8 lbs. 12 oz. and 20 inches long. He came quick and had some difficulty with the amniotic fluid not dispersing very well and getting his lungs clear so there were a few scary moments and all of them staying in the hospital a little longer than expected, but they are home now and as you can see here, my 1st grandson, Andrew, is all smiles and happy his baby brother is finally home.
 I stayed with Andrew while his parents were in the hospital and we had such fun. We cleaned the house and got it ready for his mom and dad and new baby brother to come home to, went shopping for presents for them (which he picked out personally and his mom definitely liked that purple nail polish he picked out for her) and went to see the movie “Chipwrecked” with the Chipmunks.
And here is Mimi (me) with Baby Owen. Don’t babies just make your heart melt?
I know I have been amiss with my postings lately, but it has been a difficult few months especially in finding help with the care of my stepson. My camera has also gone AWOL (I am hoping I find it so I don’t have to buy a new one). These photos were taken with my camera phone and my daughter’s but I do hope I can locate my digital one soon! I have a few cards waiting to be photographed using new products from the Sale-A-Bration and Occasions Mini Catalogs that I want to show everyone. We made the projects at my Customer Appreciation Holiday Party last Monday. And I hope to do a Blog Candy giveaway so check back soon!
Asheville, NC Stamp/Scrap Retreat
 I finally arrived at my Stamp/Scrap Retreat yesterday afternoon. I flew into the Greenville/ Spartansburg Airport in South Carolina and then rented a car to carry me and all my STUFF to the Ridgecrest Retreat Center in Asheville, NC. The drive to the retreat center was beautiful with all the changing foliage along the way. I managed to squeeze my clothing and all my supplies into two large suitcases and one small carry-on. All arrived safely without incidence, except for a brief inspection of one of my suitcases by the TSA as indicated by this tag.
  They were probably wondering what all those scissors and blades were doing in there. LOL! I have been having alot of fun meeting new friends, sharing ideas and attending classes.
I’ve included some of the projects I’ve been working on so far – holiday gift tags using the Letters to Santa Designer Series Paper and a gift card that will be offered in my Holiday Gift Card Stamp a Stack on December 8 and 15 from 6-10 p.m. Take one class or both. Cost is $20.00 for each class. This gift card holder is perfect for the men in your life. Very manly with the woodgrain paper from the Frostwood Lodge Designer Series Paper pack along with the stately deer from the Winter Post stamp set. When open, the gift card sits in a pocket on the left and your word saying is on a small card to the right.
Will try to post again later tonight with more projects from my retreat. Thanks for checking in with me!
Tag Supplies: Stamp Sets: Bright Hopes, Winter Post, Tags Til Christmas and Short & Sweet; Cardstock: Early Espresso, Cherry Cobbler, Whisper White, Marina Mist, and More Mustard; Ink: Early Espresso and Cherry Cobbler; DSP: Letters to Santa; Accessories: Big Shot, Two Tags Die, Punches: Extra Large Oval, Boho Blossom, Decorative Label, 1-3/4″ Scallop Circle, 1/8″, 1-1/4″ & 1-3/8″ Circles and Postage Stamp, Cherry Cobbler and Early Espresso Quilted Satin Ribbon, Chantilly Crochet Trim, Basic Pearls, Linen Thread, Rhinestones, Sponge Daubers, Distressing Tool, Stampin’ Dimensionals.
Manly Gift Card: Stamp Set: Winter Post and Christmas Greetings; Cardstock: Early Espresso, Cherry Cobbler and Winter White; Ink: Cherry Cobbler and Early Espresso; DSP: Frostwood Lodge; Accessories: Extra Large Oval Punch, Early Espresso 1/8″ Taffeta Ribbon, Early Espresso Quilted Satin Ribbon, Big Shot, Petals A Plenty Textured Impressions Embossing Folder, Stampin’ Dimensionals and Sponge Dauber.
Shake It Up!
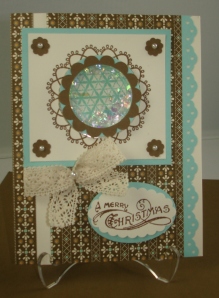
Sorry it has been so long since I posted, but family issues prevailed with hiring a new caregiver assistant to help me out with my stepson, Donnie. Well, mission accomplished! So I have been back to stamping and making Shaker Cards just in time for my Holiday Stamp A Stack last night and it seems to have been a hit. The fear of learning how to use the new Shaker Frames has been overcome. Thank goodness! Once you learn what punch works the best with each size of frame and how you are going to frame it out it gets easier from there. I love the way the Spice Cake designer series paper is so inviting and warm and not just for Fall, so I made a series of shaker cards for Christmas. Check out those sparkly Mica Flakes in the shaker frames and the bows on all my cards were made using the Crochet Trim and looping the ribbon and then cinching it in the center with Linen Thread.
All participants of this class received the shaker frames and a container of mica flakes as part of their class fee. Don’t miss out on next month’s final Holiday Stamp A Stack to be held on November 17 or 22 from 6-10 p.m. in my home studio.
Supplies:
Card #1 – Stamp Set: Hello Doily and Bells & Boughs; Cardstock: Very Vanilla, Pool Party, and Soft Suede; Ink: Soft Suede and Pool Party; Accessories: Shaker Frames, Window Sheets, Mica Flakes, Eyelet Border Punch, Itty Bitty Shapes Punch Pak, Basic Pearls, 1-3/4″ Scallop Circle Punch, 1-3/4 and 1-3/8″ Circle Punches, Extra Large Oval Punch, Scallop Oval Punch, Mini Glue Dots, Stampin’ Dimensionals, Linen Thread and Victoria 5/8″ Crochet Trim.
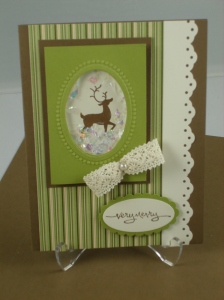 Card #2 – Stamp Sets: Winter Post and Short & Sweet; Cardstock: Soft Suede, Very Vanilla and Pear Pizzaz; DSP: Spice Cake; Ink: Soft Suede; Accessories: Eyelet Border Punch, Big Shot, Designer Frames Textured Impressions Embossing Folders, Extra Large and Large Oval Punch, Mica Flakes, Shaker Frames, Basic Pearls, Victoria 5/8″ Crochet Trim, Linen Thread, Cello Bag, Mini Glue Dots, Stampin’ Dimensionals and Scallop Oval Punch.
Card #3 – Stamp Sets: Four the Holidays and Bright Hopes; Cardstock: Very Vanilla, Soft Suede, and Pool Party; DSP: Spice Cake; Ink: Versamark; Accessories: Embossing Heat Gun, Pewter Embossing Powder, Mica Flakes, Shaker Frames, Petals A Plenty Textured Impressions Embossing Folder, Big Shot, 1-3/4″ Scallop Circle Punch, 1-1/4″ and 1-3/4″ Circle Punches, Very Vanilla 1/2″ Seam Binding Ribbon, Mini Glue Dots, Linen Thread and Basic Pearls.




.jpg)


